First up is the picture of me just getting started. I used 1/2 inch plywood (the nice 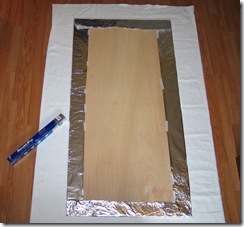 sanded type) and added a layer of heavy duty aluminum foil. I then wrapped that with 100% cotton batting (Warm and White), 2 layers. I am thinking now that I might want more padding. The plywood was more expensive then the regular type because I was not paying attention when I picked it up. Regular, cheap plywood is fine. Also, the foil may not be necessary, but I wasn't sure. My plywood was supposed to measure 30" x 60" but was a little more in both length and width. Which was strange since I watched the woman measure accurately. She may not have cut as accurately though (she was new at Home Depot).
I then wrapped bleached muslin (the cheap kind-no photo) and the silver  ironing board fabric. If I recall correctly, I used 2 yards of each fabric because of the widths they came in. I stapled around the edges like crazy. I think I get carried away with the staples on any project like this! I was undecided about what fabric I wanted to use, thus I purchased the silver stuff and the muslin. I then decided to put both on so that when the silver stuff needs to go, I still have something over the batting. I also chose Warm and White batting and bleached muslin because I tend to burn the seeds in the natural types and stain my fabric.
I decided for now to just 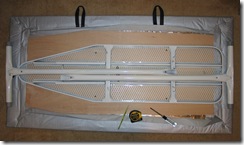 screw it to my old ironing board. I added some handles for easy moving by myself. The handles, screws and ironing board base were all re-purposed stuff I had on hand. The wood, foil, fabrics and batting were all new. The handles I cut off a free bag. I really despise those particular bags as they do not feel like real fabric. They tear way too easily.
Another view of the back, leaning against my fabric closet: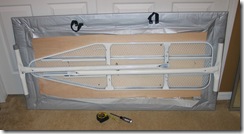 (You should be able to click on the pictures for the larger version to see any details that may be of interest. *wink*) I think I am going to add one more larger handle to the opposite side for ease in standing this thing up. I open the legs while it is like leaning because I cannot do it the normal way the old ironing board works. However, I cannot seem to stand it up on my own very well. Another handle should fix that though. It is not really that heavy. The old metal stand I am using is the heaviest part, lol!
Here it is set up as I will normally keep it in my tiny sewing room. 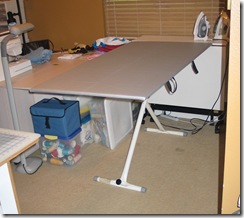 Please excuse the mess and the nasty carpet. This is the only room with the original carpet still in it. I have yet to shampoo in here during my deep house cleaning the past week or so.
I love how at the top height it snugs up perfectly against my extra cutting table by the window. This allows me to keep my irons and ironing supplies off the board.
Here is the board in use. Of course, this is not a large piece of 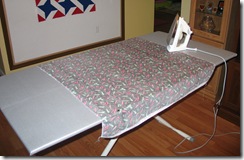 fabric. I wanted the set up out here to be visible.
When I want to iron my large pieces of fabric and quilt tops, it will be set up here in the formal dining room. This room is still mostly empty as my large dining table is in the small breakfast nook right now. I like it this way at this point because this empty floor space is where I cut and pin patterns that are oversized like home dec, and where I layer and baste my quilts. It use to be my sewing room, thus the fancy design wall you see in the background. My new sewing room, oldest son's old room, is unfortunately just too small for a design wall.
 I must say again that I am loving this board. I realized that I do still need a regular ironing board. I wanted to be able to remove the big board and still use my ironing board, but for now I purchased a small table top one for only $7.88 (guess where at that price, lol, the 88 cents is a giveaway). That will work fine for now. Eventually I want a really nice ironing board for garment construction and regular clothes ironing. I also no longer care for ones with T style legs. I'd much rather have the type with 4 legs as they are more stable to me. I have had this ironing board for, most likely, going on 17 years.
I also did not do cleats or anything on the bottom of the board to hold it on my old ironing board. This way, I can take it off, and it fits perfectly on my main cutting table in my sewing room. Here's a picture of that cutting 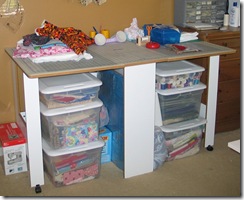 table without the board on top as I forgot to photograph it while it was on there before screwing it down. Duh. Anyway, this table is old and broken so I do not fold it up and move it around anymore. I like that I can store stuff under it unlike the newer one from JoAnn's. One day when I make curtains and other stuff for my sewing room, I will make a skirt to hide this stuff and protect it from sunlight.
Well, that's my DIY board. As I said I love it. I am re-ironing the backing for my daughter's butterfly quilt now. One of the reasons I finally made this board was that backing. It was a nightmare ironing and was still very wrinkled using my old ironing board. The backing is 90 inch wide bleached muslin.
Next post, I will be posting some photos of a few finished projects that I have been working on. Until then....
Happy Sewing,

6 comments:
That is so cool that you made your own bigger ironing board!
This is awesome! Maybe someday I will get to where I need one of these! Ha!
Thanks so much for sharing. That's a great idea. Your butterfly quilt is sweet. Your daughter will love it.
Your huge ironing board is a GREAT idea. One day when I have an actual craft room, I'm making one.
And thank you for the tips on sewing with knits! I'm sure I'll learn more as I go along.
Sunny, I love your tutorial for making your own big board ironing top! Now I need to make mine!
Post a Comment